Building my first keyboard
NB: I wrote most of this post in March 2024, but felt like I had a lot more to say, so kept it in my drafts until now. I don't actually remember what more I wanted to say, and a lot of the things I learned in the process are now redundant! So did a bit of editing and published it now, almost 2 years later. Everything after "The Build" is recent.
There's something quite different about this post. I'm typing much slower than normal. The reason for that is that I'm not used to the keyboard that I'm typing on. That's right folks, I finally did it. I built my first keyboard! And what a journey it's been!
There's a large and active community of keyboard enthusiasts, and I could not have learned as much as I have without them (especially the ZMK Discord server), so part of why I'm writing this is to document my learnings. I could write several posts to dig a bit deeper into individual aspects, but for now I'll just summarise my journey up to now while getting some typing practice (frankly, programming is going to be a bit harder compared to writing English prose). This has all been over the course of many weeks, on and off, so bear that in mind.
Keyboards
For a while, I had been using a cheap bluetooth keyboard off of Amazon. This served me well with my setup (I'll write more about that separately, since it's unusual and people have asked me about it). I then switched to a cheap folding BT keyboard with a trackpad and multiple BT profiles, and frankly it was a bit of a downgrade. I wanted something that was clean, portable, and efficient.
I had come across futuristic takes on keyboards and fancy ergonomic keyboards, via friends and research, all with large price tags. Some examples are:
- The Tap Strap 2
- The CharaChorder
- The Twiddler 4
- The Moonlander
- The Ergodox
- The Ultimate Hacking Keyboard
- and quite a few more
Most of these are programmable and you can flash the keyboard controllers usually with QMK or ZMK firmware. There are some differences between the two, most notably that QMK is easier to use and has better support for mouse emulation, while ZMK is open source and has better support for wireless (especially split wireless) keyboards.
What does it mean to build one?
You're probably not going to design your own PCB, although I'd like to do this one day, as the PCB I'm using is open source. The rest is quite doable with basic electronics and soldering skills. It looked a bit intimidating to me from the outside since I didn't understand how the different components worked together, but it's possible to get kits. Since I didn't want to spend more that £100 to break into this hobby, I made things a bit harder on myself than they needed to be (and ended up spending more than that anyway, but it was worth it for the learning).
I wanted to build a wireless split keyboard, so some of this is specific to that, but it's not hugely different for normal keyboards. You need:
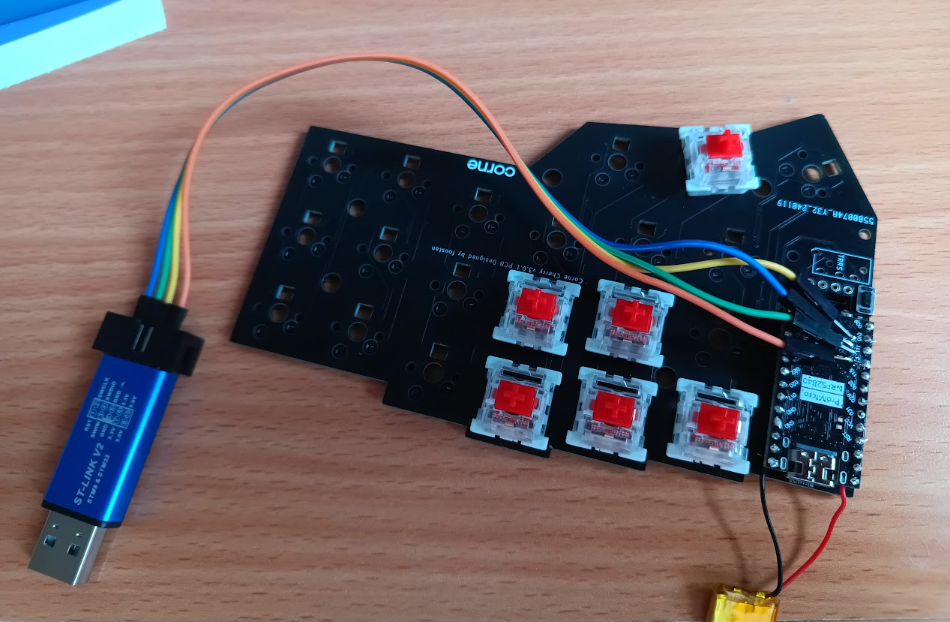
- A PCB
- Sockets and diodes
- Make sure that the kind of sockets you get fit into the board and match your switches
- Switches
- MX switches -- most common and easiest to find keycaps for, but chunkier
- Choc switches -- lower profile but newer and less common, so harder to find keycaps for, although Choc v2 is MX-compatible at the cost of footprint
- Key caps
- There is a whole industry of wild and wonderful styles and colours of caps (especially MX caps as mentioned) and I often see Etsy artists making custom resin key caps. For my first build however, I harvested these off of an older, normal mechanical keyboard.
- Controllers
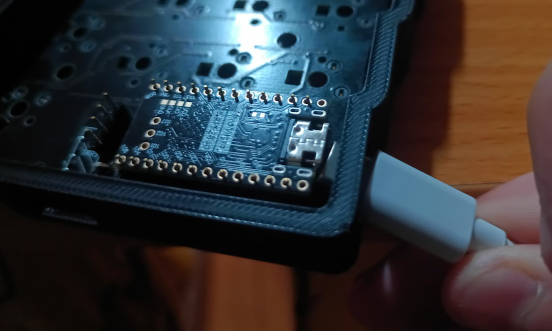
- The most typical controller for split wireless keyboards is the nice!nano. I'm using a cheap clone of this off of AliExpress called the SuperMini NRF52840. This did cause some problems.

- The most typical controller for split wireless keyboards is the nice!nano. I'm using a cheap clone of this off of AliExpress called the SuperMini NRF52840. This did cause some problems.
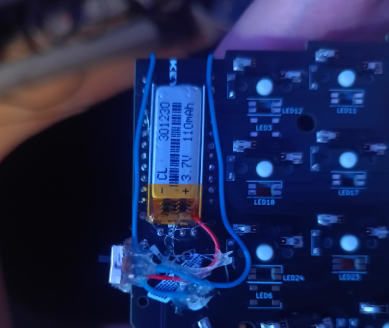
- Battery
- Cheap AliExpress batteries will do. I also had a box of on/off switches and I glue-gunned one to each side so I can turn everything off when I want to.
- Cheap AliExpress batteries will do. I also had a box of on/off switches and I glue-gunned one to each side so I can turn everything off when I want to.
- Display (optional)
- This is optional, but common and useful. The nice!nano has a compatible display called the nice!view, but you can also use generic OLEDs (which is what I did). It could be that my build is not as battery-efficient as the brand one.
- Case
- I opted for 3D printing from a case someone else made, but you can also use laser-cut acrylic for a thinner profile.
The build
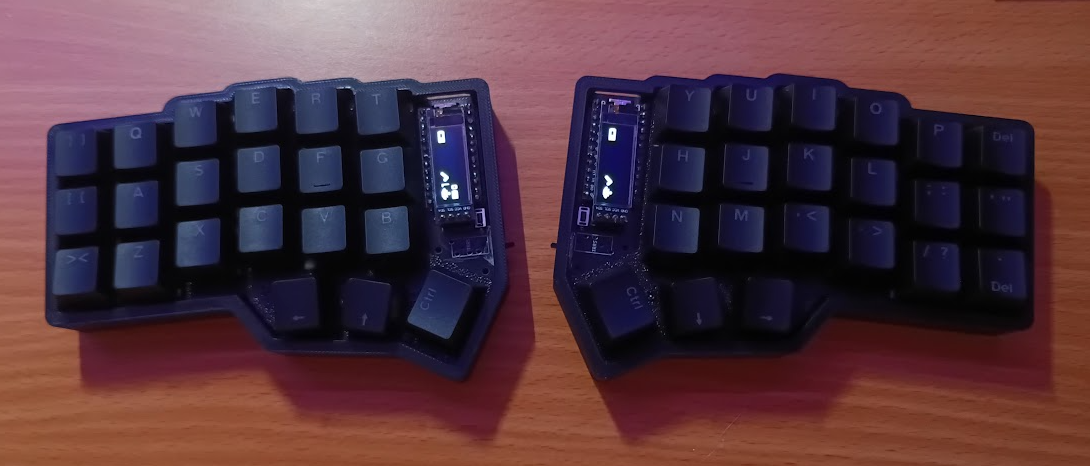
I considered documenting every step of the way here, but let's fast forward! All soldered and assembled, this is what I use:
For the most part, the building was easier than I thought. I think I only really had two main problems. The first one, and biggest slowdown, were that my controllers came broken. This was a whole bit rabbit hole of troubleshooting, and I even bought a special in-circuit debugger/programmer, but long story short, the controllers just wouldn't pair with each other.
Normally, the left side is the master (and connects to your actual PC or phone) while the right side is the slave. The correct terms are "central" and "peripheral". This is not uncommon, and there are troubleshooting instructions, but eventually I narrowed it down to a hardware issue. The moment my replacements arrived, I flashed them and they worked right out of the box.
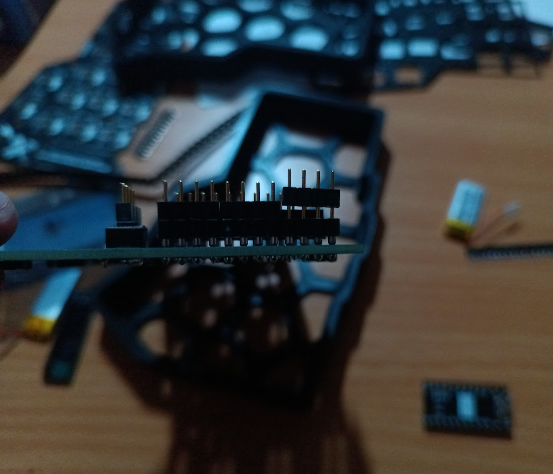
My second problem was soldering things on and off, because of the above situation and also mistakes I made. I wasn't really following a guide since I didn't order a kit, just the parts, so I was winging it somewhat. My controllers were at an odd height if I soldered them to removable pins, not aligning with the holes in the 3D-printed case, so I soldered them straight onto the board in the end, which was too permanent!
This is the point at which I finally upgraded my soldering gear and got more tools. I'd always been able to get away with the simplest iron (plug it straight in and nothing else), but now I had a reason to get solder remover, a sucker, an iron with adjustable temperature, etc, all in a nice set off AliExpress again. This was one of the budget killers in theory!
Key maps
So the hardware is done, now it's time to program it! At the time, I thought it was so convenient how you flash firmware onto it. No need for special hardware for flashing, or worrying about accidentally bricking it. It just shows up as a USB drive on your PC and you drag the .uf2 files into it. That's it!
But now it's become even easier as you can use https://zmk.studio/, which I haven't gotten around to trying yet. I instead used a tool called ZMK Configurator which has a nice UI and builds in GitHub actions. ZMK also has a notion of "layers" that are a bit like pressing shift, except you can change your whole layout. You can also have keys that switch to every device simultaneously connected to the same keyboard via Bluetooth. It's surprisingly robust!
A friend pointed out that these days (unlike 2 years ago when I was doing this), you can just ask Claude Code to edit your config for you. You can find my full config here on GitHub. This is especially useful as ZMK can do some pretty crazy things! E.g. look at all the variations on just one aspect of hold-tap behaviour!

Some customisations I've done to my key map over time that I really like. I'm a big fan of mod-morph:
- Workspace switching via mod-morph: The top row (Q-P) becomes numbers 1-0 when holding GUI/Super, sending
Super+Ndirectly. This avoids the awkwardSuper+layer+numbercombination since numbers are normally on a different layer. - Top-left key is Esc, Ctrl+Tab, or Super+Q: This is done with chained mod-morphs. It's Esc by default, but when you press it with Ctrl, it acts like Ctrl+Tab (e.g. for cycling browser tabs, and you can do Shift+Ctrl+that key to go backwards). When you press it with Super, it sends Super+Q (e.g. for quitting windows). I needed this because I can no longer actually press Super+Q the normal way because of the point above.
- Ctrl/Tab hold-tap: The key below that is Ctrl when held with another key, but Tab when tapped alone (200ms tapping term).
- Backspace/Delete mod-morph: my top right key is Backspace normally, but Delete when holding GUI.
- Enter on bottom-right: The default enter position in the thumb cluster is crazy to me, and I kept sending messages before I was done typing them. So I moved it to the bottom right at pinky position, similar to a normal keyboard.
- HJKL arrow keys: I'm a vim user, so this was a no-brainer. When I switch to the lower layer, my HJKL keys become arrow keys.
- Media controls: Volume, mute, and playback controls on the lower layer's bottom row.
- Bluetooth device switching: Lower layer includes BT_CLR and BT_SEL 0-4 for managing up to 5 paired devices. I really never need to have more than 5 devices paired to my keyboard at the same time!
One thing I've alluded to but not mentioned is my old "Work from Phone" setup. I'll write about this in more detail soon, but the important bit here is that Android likes to steal your Super key for Android-y things like taking you to the home screen. To get around this, at the time, I used a tool called ExKeyMo to remap my keys Android-side. But nowadays, you can actually configure Android to send Left-Alt instead of Super via native settings. What this meant is that I can keep my ZMK mappings normal, and simply and run this on my PC to make it treat Left-Alt like Super:
xmodmap -e "remove mod1 = Alt_L"
xmodmap -e "add mod4 = Alt_L"
Now, when I switch desktop workspaces via a remote desktop app, it doesn't do weird things like switching Android apps!
Two years later
Spoiler alert: I've built a second Corne keyboard in the meantime! More on that soon. However, I've become very fast at using this keyboard in the meantime, and I carry it around everywhere. I now actually struggle to use a normal keyboard, but that's fine by me.