Sanctum (smart home)
Overview
For many years I've had some sort kind of smart home setup (or more accurately, a smart shoe-box room in an overpriced London flat-share). I even wrote a short paper about smart home networks. However, my setup was really quite clunky, via a big, monolithic script (first in Node.js, then Python). This year, I brushed up the whole setup.
I alluded to this new setup in many places (like here, here, here and here). I moved all that logic to the fantastic Node-RED tool, which I run on both my smart home Raspberry Pi, as well as a cloud instance for some fancier stuff. These two communicate via MQTT.
Hardware
LEDs
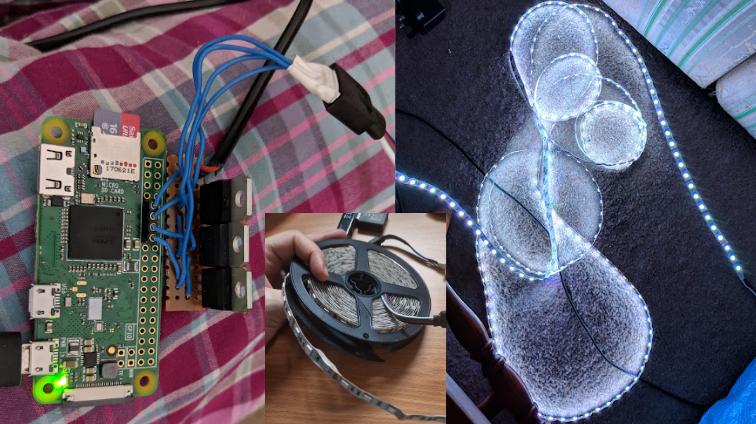
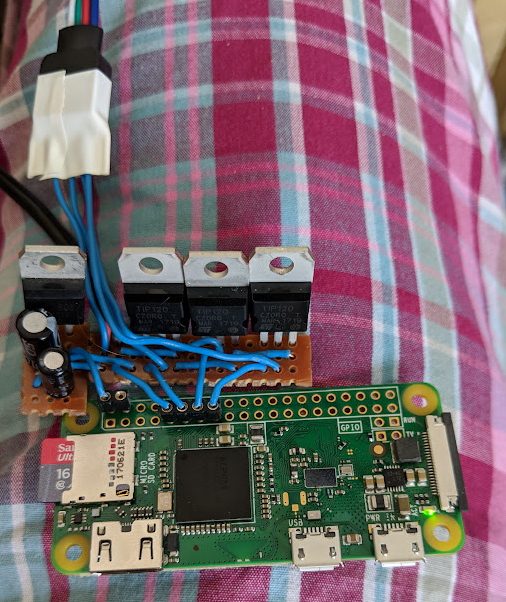
The core of it is a Rasberry Pi Zero W. One of the first things I wanted to do was control a strip of LEDs that would run across my window (the whole thing was on my window sill). I found a cheap strip of RBG LEDs that was just about long enough to wrap around my window. To control the RGB channels, I used the RPi's GPIO pins that let you write an analogue signal (PWM pins I suppose) and TIP120 NPN transistors. I didn't set out to use these from the start, rather they were what was available at the university EE lab, and the technician let me have some. My budget for electronics was basically zero, so I was quite grateful to the EE lab for letting me borrow things!
Power
I wanted to have it powered from mains, rather than USB, so also got a little voltage regulator from the lab, and some capacitors for the circuit, but this turned out to be a pretty bad idea, as the thing got stupidly hot.
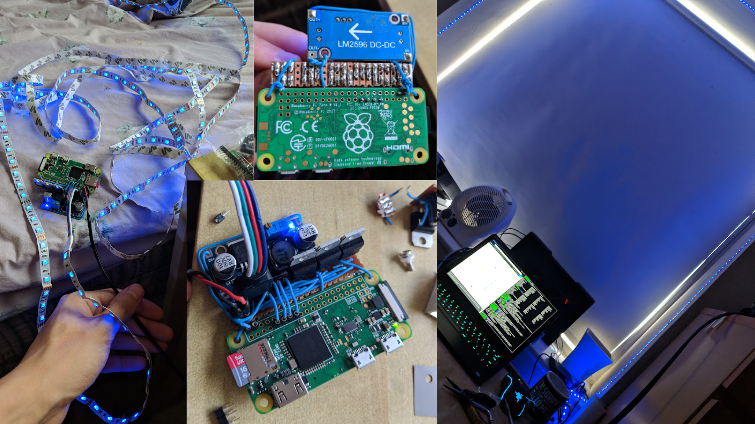
So instead I got these adjustable voltage regulators from Amazon that let you turn a little screw to control the output voltage. They have two pins in and two pins out (positive and negative for both).
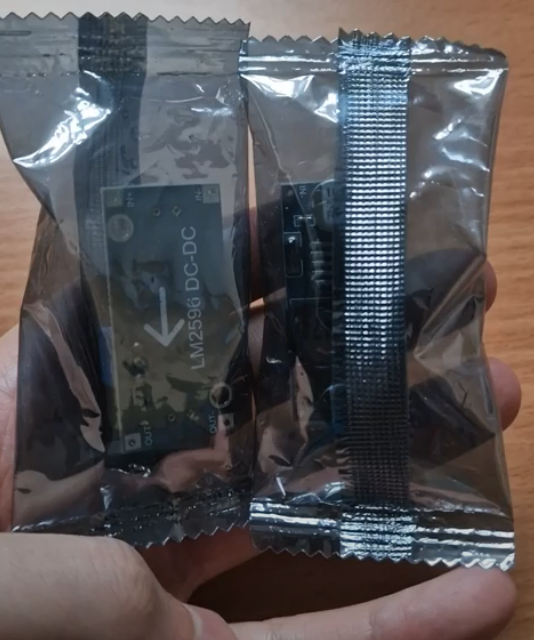
Once I attached one of these to the little setup, I didn't have heat problems anymore.
Since I had the heat sink though, I decided to attach it to one of the transistors anyway, even though it doesn't really get that hot, but I thought it can't hurt! I had a 12v mains plug, but I didn't have those little thingies that let you screw in actual wires into (on the right -- I have it now but didn't at first), so I cut the end of and MacGyvered two pins onto it.

Container
I didn't really have anything box-like to put it in, and although I had free access to a hackspace, you still had to pay for materials yourself, so I didn't 3D-print something as I had already blown my budget at this point! So instead I put it in that unused flower pot you see in the picture of my window above. It was all actually quite finicky and unsafe (especially the power situation), but I figured if there was a fire then hopefully the flower pot would contain it somewhat.
Monitor and projector
Someone had thrown out projector that was perfectly fine, except for a barely-noticeable line across the left side. I only needed a mini-HDMI to HDMI cable which was on Amazon Basics. I got the monitor the same way (although it only had a DVI port, so in that case I needed to go HDMI to DVI).
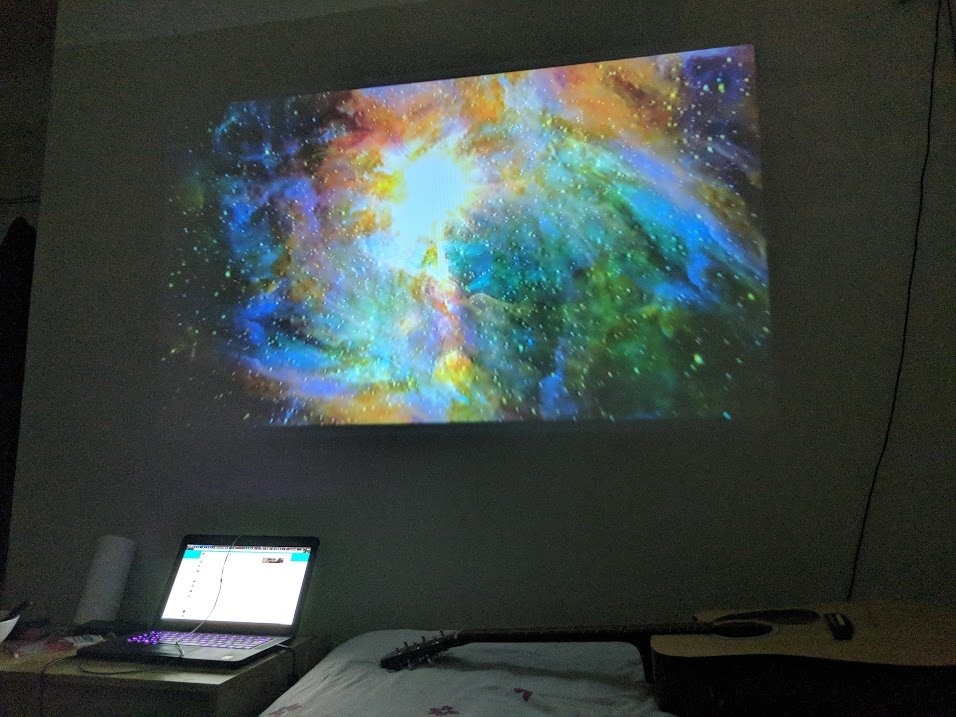
I fiddled around a lot with running screen-casting software on the RPi to stream to this from other devices to create a wireless monitor of sorts (the main issue was always latency). In the end, lazycast did the job, but it was still a bit fiddly and would crash. Fortunately, it also let you just put videos on a USB drive and loop them, which was enough for me to play some atmospheric starscapes!
Smart blinds
I had this idea to also jerry-rig some kind of mechanism for rolling my blinds up and down.
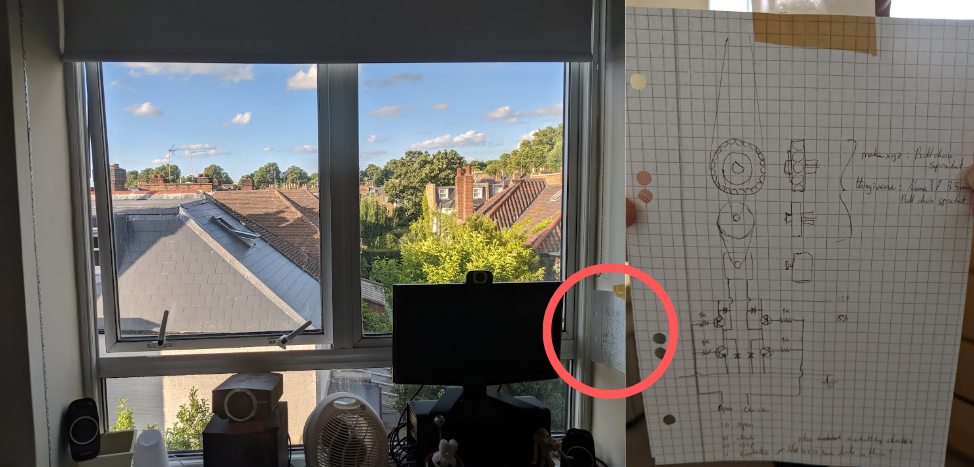
It just an H-bridge, a stepper motor, and ball chain sprockets (3D-printable) that I found on makexyz.com and one on Thingiverse. The idea was that you can control everything with two pins, where I labelled the 4 states (10, 01, 00, 11) as "open", "close", "stop", and "explode" respectively. I didn't explore this further because the landlord would never let me drill into the wall (and I would kind of have to for this to be stable enough to control the blinds).
Misc
I also plugged in a USB hub that I had, and a little USB adaptor for audio/mic which I plugged into speakers. This allowed it to pick up my voice and play audio.
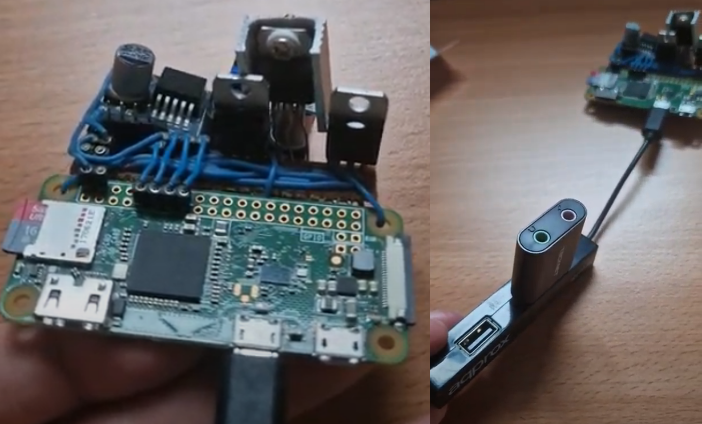
I was working with what I could get, as originally my plan was to use this ultra-cheap USB mic, but the audio quality was abysmal. So once again, I managed to get two pretty high-quality USB webcams for free from a computer vision PhD student that didn't need them anymore. I didn't need the camera, but they had a good mic built in. I had also written some really janky motion detection recording thing once (that's a story for another day) so maybe I could even do something with video with this project in the future too.
Software
As mentioned earlier, I controlled everything via Node-RED, rather than the earlier janky scripts. This has grown in complexity over time, so I'll focus on the relevant parts here.
Local instance
On the Raspberry Pi itself, I have one flow that controls everything. It looks like this:
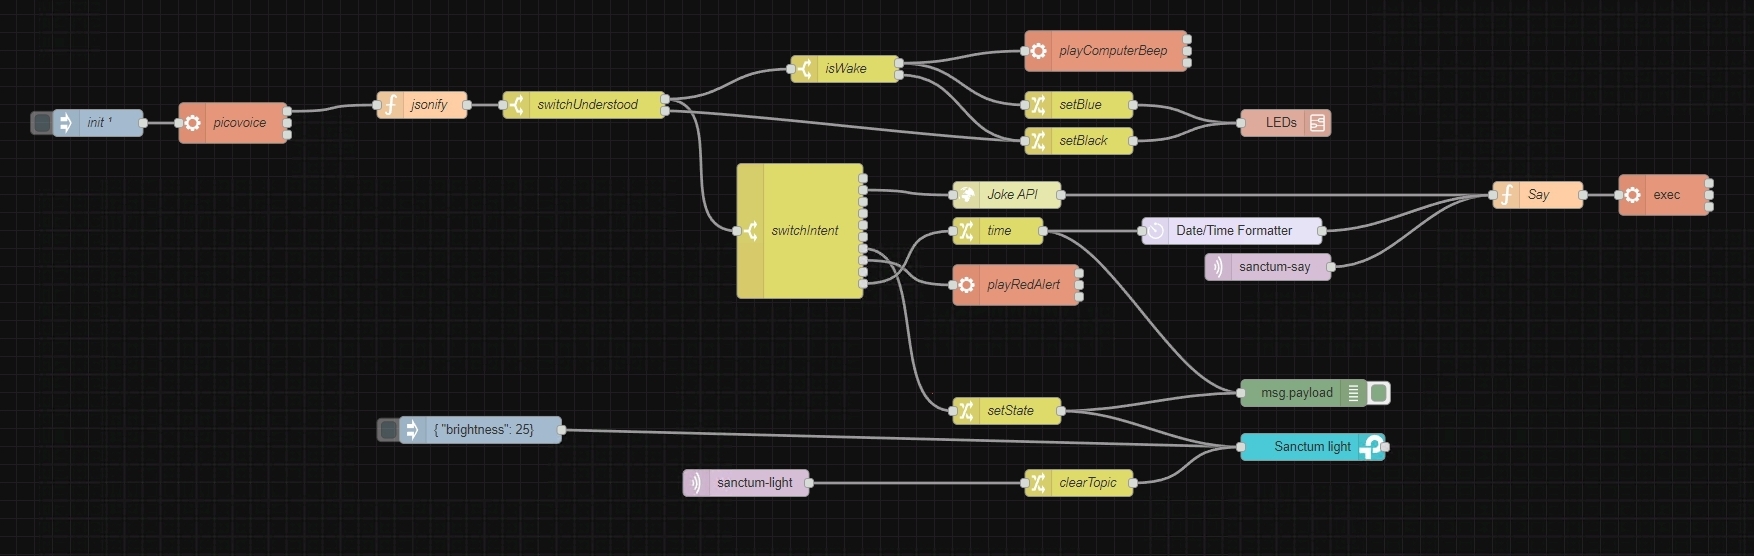
There's a lot to unpack here. So let's go top to bottom.
Speech recognition
I used Picovoice to handle speech recognition, as well as wake word detection ("Hey Siri") and intent inference. My wake-word was "Computer" (like in Star Trek) although sometimes this would cause it to trigger when I just happened to be saying something about computers, so it wasn't ideal. Picovoice let you use your own wake words, but there was a bunch of pre-trained ones already (the usual suspects like "jarvis" and so on) that were free, and I like Computer so I used that.
Originally, I wasn't using Picovoice, I used some cloud APIs (including Google's one at some point) and wit.ai for intent, but I decided that it needs to be fully offline. Most offline models were pretty bad, except for Picovoice at the time. If I did it again today, I would give Whisper a shot. I might also continue to experiment with other ways of inferring intent.
Picovoice let you use it for free for personal use, but you needed to redownload the model every 30 days because it has this built in DRM thing where it disables itself otherwise. To get around this, I used libfaketime to make it think that we're living 7 years in the past. Why 7 years? Because the calendar repeats at that point, and I wanted my command for saying the weekday to still work properly (it doesn't say the year). I don't consider this a malicious hack because it literally affects nobody (just makes my life easier) and also I told the developers about it.
LEDs
When it's awoken, two things happen. We play a beeping (the beeping from Star Trek of course) and the LED strip turns blue (similar to an Alexa I suppose). They also turn off if the command is not understood (black). The actual LED logic is contained in this subflow, which uses GPIO nodes:
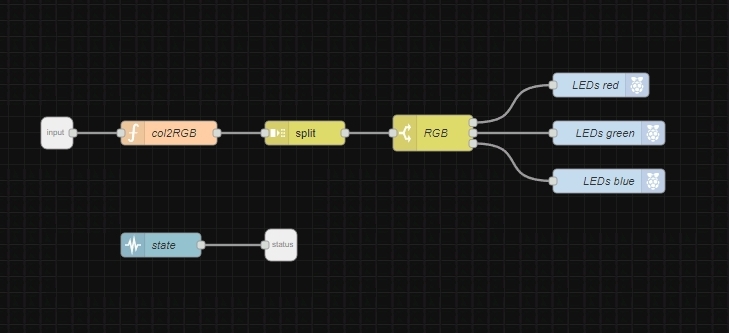
The col2RGB function doesn't actually do anything clever, rather I just manually mapped colour names to values that I thought looked good through experimentation (if you were too exact with the values, sometimes they looked pretty bad, usually too bright).
const col2RGB = col => {
    switch(msg.payload) {
        case 'blue':   return [0,   0, 10];
        case 'green':  return [0,  10,  0];
        case 'orange': return [10,  5,  0];
        case 'pink':   return [10,  2,  2];
        case 'purple': return [10,  0, 10];
        case 'red':    return [10,  0,  0];
        case 'white':  return [10, 10, 10];
        case 'yellow': return [10, 10,  0];
        case 'warm':   return [10,  5,  2];
        case 'cold':   return [8,   8,  1];
        default:
        case 'black':  return [0,   0,  0];
    }
};

msg.payload = col2RGB(msg.payload);
return msg;
In my original hacky monolith script for controlling these I had commands for setting their colours directly, but I actually found it a bit annoying and decided not to bother porting that part to Node-RED. So the LED strip became mostly an indicator for telling me that it's listening.
Intents
There were a bunch of other commands that I ported over from the monolith script with their own parameters. These are:
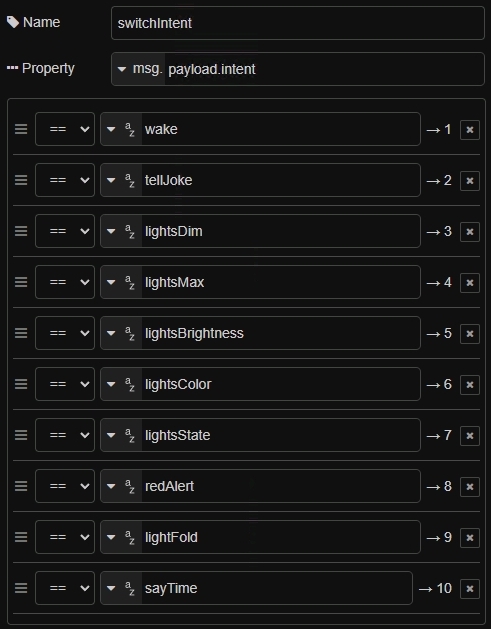
Most of them are self-explanatory, though I didn't end up implementing the ones I never used anyway. For example, I tend to turn the lights on and off, and that's about it. I don't really change the colour!
Controlling my smart bulb was quite straightforward as it's done via a wide-open HTTP endpoint, but I didn't even need to touch that as there's a node for it. This node, and many other, made me realise just how insecure Node-RED is (and they don't really plan on changing that), but let's not get sidetracked!
Similarly, redAlert would play the Star Trek klaxon and flash my lights red (lightFold is something similar, but from a different show), but I never really used it, and also it would freak the cat out.
So I implemented the command that tells me what time it is, and a command for telling jokes (there's an interesting story with this that I'll write about soon!) and left it at that.
Audio
Most commands eventually led to a command that would turn text to speech and play it from my speakers. There are much better tools for this these days, but I wanted to use something fully offline that can run on a RPi, and the only one I found that sounds half-decent was pico2wave (no affiliation to picovoice).
It could take a bit of time to generate long text though, so a small improvement I made was to cache audio clips on the file system and simple play those if they already exist, instead of generating from scratch every time. A lot of audio was repeated so this helped. To make it efficient, the filenames were a hash of the actual text spoken.
(async () => {
    try {
        const text = msg.payload;
        const fs = global.get('fs');
        const path = global.get('path');
        const shortHash = global.get('shortHash');
        const hash = shortHash(text);
        let cmd  = `play speech-cache/${hash}.wav`;
        if (!fs.existsSync(path.join('speech-cache', hash + '.wav')))
            cmd = `pico2wave -w speech-cache/${hash}.wav "${text}" && ` + cmd;
        //rm -f speech-cache/_${hash}.wav && ` + cmd;
        //sox speech-cache/_${hash}.wav -r 48000 speech-cache/${hash}.wav &&
        node.log(cmd);
        msg.payload = cmd;
        node.send(msg);
    } catch (e) {
        node.error(e);
    }
})();
return;
I mentioned before that I have a Star Trek Computer beeping before listening to a command. This actually serves a second purpose too. Sometimes I don't hear the beeping, because my speakers take a second to actually turn on once they get a signal, but in that case at least the beeping got them turned on so I can hear the responses.
Finally, I also had the RPi play music via the excellent raspotify. It would make your device show up on any other instance of Spotify that you can control it from. I didn't end up adding commands for this (instead just control it from my phone or laptop, even indirectly with Google Assistant), because my wake word detection was actually pretty bad at hearing the wake word while music was playing. I think hardware wake word detection (like commercial home hubs have) work much better, and also filter out the audio output, and it would be great to be able to do the same myself some day!
Cloud
You might have noticed those MQTT nodes called sanctum-say and sanctum-light. These are channels that allow me to communicate with a cloud Node-RED instance. I won't go into the full details of this here, but the most relevant part is this:

The blue boxes are inputs and outputs to my various chat accounts (WhatsApp, Signal, Discord, Slack, IRC, Gitter, Matrix) wired up using Matrix bridges. "Red" is a bot. This has allowed me to build many other cool things before.
By having it connect to the sanctum MQTT bridge, I can control smart home things via chat messages too! This has had some unforeseen side-effects in the past, but that's a story for another day.
The main thing here is that if somebody sends me a message that starts with !shout, my speakers will say whatever the text is following that. This was an experiment that I did with Veronica (we live together and sometimes she wants to get my attention about something in the flat but I turn all my notifications off) so in an emergency she could send that command. nicaFilter in this case blocks any messages that don't come from her, so this is not abused.
Future
- Control everything via my communicator
- Have many more useful commands (and routines). I want to have it play playlists that are perfectly timed to some daily routines, so I don't even need to look at my calendar, but I would just know what needs to be happening based on the real-life soundtrack that's playing.
- Acquire much better hardware and make everything much more professional (and safer!)
Amar Memoranda > Sanctum (smart home)
 Yousef Amar
Log
Sanctum project and Christmas Giveaway
Welp, looks like I'm a month late for the N-O-D-E Christmas Giveaway. You might be thinking "duh, Christmas is long gone", and I also found it weird that the deadline was the 31st of January, but it turns out that that was a mistake in the video and he corrected it in the comments.

Since I keep up with YouTube via RSS, I didn't see that comment until it was too late. I only thought to check again when my submission email bounced.

Oh well! At least it gave me a reason to finally write up my smart home setup! This also wasn't the first time that participating in N-O-D-E events really didn't work out for me -- in 2018 I participated in the N-O-D-E Secret Santa and sent some goodies over to the US, and really put some effort into it I remember. Unfortunately I never got anything back which was a little disappointing, but hey, maybe next time!